Sunday 31 May 2009

DIY bird cage veil in the making

the ideas in my brain were like the scattered trimmings and materials scattered here on the dining table...
what to do in making of a birdcage veil?


lets step back in time... several months b4... i had the idea of having a birdcage veil...

the pics i found were v pretty...

couldn't believe there were so many diff kinds of BC veils...

then i started narrowing things down...
1) i wanted russian netting covering part of the face, not just sitting up like background lace
2)i wanted to wear my hair in a low bun on the side - hence the focal point would be low, on the side
3) i wanted to use my existing materials - off white russian netting, ivory and lavender feathers, my silk flowers


i bought 2 packets of DIY veils / headpiece kits for $4 each! each pack with clips or headband and feather decorations and all... i had one in lavender, the other one red adn black...
what bargains from spotlight!(as they were already reduced to $8 from i think $15... then there was a further 50% off)
the russian netting was not such a bargain... i cannot recall the $... but it was bought in a proper hat studio...
i decided to make a 1/2 dome, so the netting would sit on 1/2 the head... so i began with folding
twisting...
sewing and beading...
a swarovski 4mm bicone with a pearly bead on top...
to join the 2 pieces of russian netting...
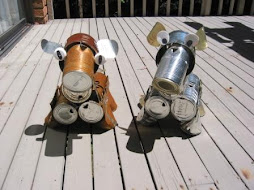
i also dotted more crystal / bead combo around the place for sparkles... so now pooh bear has a "shower cap" )snowflake's description) or "chicken wire(mcduck's description) of a veil... please ignore the "tail" - it is currently awaiting for embellishment and it is unfinished...
ideas for the embellishments included: hmmm...
hmm...

i have to work abit more on the silk flowers first...

DIY silk flowers

it was time to start on the flowers with the silk fabric i bought at the beginning of the year (in the colours of the handbag)... pale pink, pale blue, deep purple, light peach...
first i sewed strips of different widths... using a chopstick to turn them right side up was easy - silk fabric was v slippery...

abit of folding and french knots after french knots later... i had a bouquet's worth...
they looked ok... quite "bridal"... but abit too angular... so i started to think...
what if the blue one turned into... a carnation? (as mcduck said, a pompom)
so i decided to transform the existing ones into diff flowers... (haven't transformed the light peach yet)... and added the purple "poppy"...
the first purple poppy had burnt edges (to prevent silk fibers from fraying), which also lightened the colour of the edges (a good look)... but it was too much work to make...

here was what i did...

cut squares of purple silk...

the squares were further cut into 4s (diff sizes = ok)
squares into circles (ovals, of diff sizes)...
layered the circles from slightly larger to slightly smaller, 8 layers in all, staggered look... then sew them together with a cross in the middle...
pulled hard...
added centre beads...
added even more beads, 6 in total at centre...
tied with french knots at the back to secure... twisted...
scrunched up...
a not v scrunched up version here... i found out later that rubbing would give a more crumbly look and the edges would lightly fray...
not bad!

Tuesday 26 May 2009

ring mark

i never wear any jewellery, not even a watch normally... until when i got my ring from mcduck 2 years ago... it had never left my ring finger... until...
we visited our jeweller for our wedding ring 2 weeks ago and he told me to take my ring off and i couldn't!
"when was the last time you took it off?"
"dunno." (never)
i learned something new that day - one should take off all jewellery b4 bed, that is including wedding ring... "fingers need to breathe at night."
righto...
so for the past 2 weeks i've tried the soap and cold water, micropore tape, finger lymphatic massage, even steroid cream on my knuckle...
apparently my "meat", skin and "lymph" had decided to make home around the ring... my knuckle had decided to overflow with swelling...
but my luck came the other night during my 48 degree shower... my have been the expansion of metal in heat... i was able to (with the help of QV wash) wriggle the ring out of my fat knuckle!
my finger was freed (and marked with history of strangulation of 2 years)

see the constriction where the ring used to sit...

now i could make good use of the platinum necklace i bought for the ring 2 years ago...


the origianl idea (2 years ago) was to wear my ring on my neck... but it never happened


now the much scratched ring body hangs loosely, dangling around the necklace on my neck...


do i need to take the necklace off every night? cos i haven't been doing that...


Sunday 24 May 2009

DIY bridal faux fur shawl

weather in september is quite unpredictable... i need something warm to go with my simple dress for our special day...
took me a day to make - it looks simple, hanging over the lamp in the lounge... just a piece of faux fur with lining, pearl buttons etc...
was it that easy to make? hmmm


the idea of a shawl came when i dug out my chance purchase from HK... a piece of good quality faux fur (for i think only HKS $10 or may be $40, either way, a HUGE bargain, considering it would retail for $69/m here)
the silk lining (2m in all) was more $, HKD $90/m (still cheap at AUD $18/m)...
i thought and thought about the design - should i do a bolero? should i do a short coat? should i do a shoulder wrap with a ribbon? at the end i decided - just do a throw! a full cover shawl that could be folded in half into a shoulder only wrap... the more simple it is the better (could then be used in the future at other occasions)

so i got to work today... first preparing the faux fur fabric... drawing out the seamline (no pattern)
lots of pinning...
using wet tea towel to set the direction of the fur b4 trimming... tedious! cutting the fur at the edges, so that sewing by machine would be possible - even more tedious!
i managed to carelessly cut a hole through the faux fur... so had to take extra time to repair...
more pinning!
the trimmed edge could clearly be seen!
now it was time to sew the edges and make measurements and cuts for the silk lining... working with silk was equally hard - very slippery!
finally the two long edges were sewn!

followed by the shorter edges and finished!
not really actually... cos i still had to sew in the buttons (to secure the folded shawl)... the buttons were to be sewn along one of the two long edges... lovely buttons! they cost more than the faux fur!
the other long edge would have the button hole ribbon sewn on... in order to make the button hole ribbon i thought it would be easier to do some braiding...
looping and sewing...

there we go...
secured :)
i have to say i was pretty sick of all the fluff (from fur cutting) and the hand sewing (the button hole ribbons)... but the end result was not bad...

here, worn as a full shawl...


surely will keep me warm!